

Precast Concrete Wall Panels: The Essential Expert Guide to Design and Installation
A field-tested walkthrough of the structural specs, plant manufacturing process, and on-site erection practices that turn factory-cast wall enclosures into durable, watertight buildings.
Modern commercial structures rely on precast concrete wall panels to deliver high-performance enclosures that go up faster, last longer, and perform better thermally and structurally than poured-in-place or stick-built alternatives. From distribution centers and parking garages to schools and office buildings, the design and installation of these factory-cast components shape the speed, cost, and quality of an entire project. This guide walks through the specifications engineers should lock down early, the manufacturing sequence happening inside the plant while the foundation is being placed, and the field practices that turn a clean lift sequence into a fully sealed, watertight building envelope.
Why Precast Concrete Wall Panels Are the Right Choice
Owners and general contractors choose precast over alternatives because the panels arrive cured to design strength, with finishes already applied and openings already cast in. That single fact compresses the schedule on the critical path of envelope completion. Compared with cast-in-place, the wall enclosure can be erected in days rather than weeks, allowing interior trades to start sooner. Compared with metal stud and sheathing assemblies, precast brings inherent fire ratings, blast resistance, sound attenuation, and thermal mass that mechanical engineers can leverage to downsize HVAC equipment.
The economic argument is just as compelling on big-box warehouses, schools, and tilt-up alternatives. With our precast prestressed wall panels, spans can reach 60 feet or more without intermediate columns, opening interior layouts that would otherwise require steel framing. Long term, the maintenance profile is minimal: factory-applied finishes resist weathering for decades and avoid the recurring repaint, recaulk, and reflashing cycles common to EIFS or metal panel systems.
Design Specifications That Drive Performance
Successful projects begin with crisp specifications. Engineers should establish four parameters before shop drawings begin in earnest, because each one ripples through tooling, scheduling, and the final field tolerances.
Structural Loads and Connections
Wind, seismic, and gravity loads dictate panel thickness, prestressing strand pattern, and reinforcement layout. A typical insulated sandwich panel runs 8 to 10 inches across two concrete wythes with rigid foam between them. Solid panels for non-insulated applications fall in the 6 to 8 inch range. Connection details (embedded plates, weld plates, and bearing pads) transfer those loads to the structural frame, and the engineer of record approves every connection before fabrication begins.
Insulation and Thermal Performance
For heated and cooled buildings, sandwich panels with continuous insulation routinely deliver R-values from R-15 to R-30. Selecting the foam type, the connector spacing, and the wythe-tie pattern determines whether the panel achieves true thermal-break performance or behaves as a less efficient hybrid. A panel that meets the prescriptive requirement for one climate zone may need an extra inch of foam in another, so specifications must reference the project’s specific energy code path rather than a generic R-value target.
Architectural Finish and Texture
The mold defines the finish. Smooth as-cast face, light sandblast, deep reveals, exposed aggregate, thin brick inlay, and form-liner texture all happen in the plant, not the field. Decisions made during the design phase ripple through tooling cost and lead time, and architects who lock in the finish early get more options at lower premiums. Color is integral to the mix, not painted on, so it weathers uniformly across the building elevation.
How Precast Concrete Wall Panels Are Manufactured
While site work is underway, the plant is already producing the building’s enclosure. The fabrication sequence runs roughly as follows:
- Engineering translates approved drawings into casting tickets, reinforcement schedules, and the daily production order.
- Steel forms or wood molds are configured for the specific panel geometry, opening locations, and connection embeds.
- Prestressing strands are tensioned across the casting bed, reinforcement cages are tied in, and embeds are positioned and secured.
- A self-consolidating concrete mix is placed and finished. For sandwich panels, the inner wythe is poured first, foam insulation and tie connectors are placed on top, and the outer wythe is poured over them.
- Steam or accelerated curing brings the panel to release strength within 12 to 24 hours.
- Panels are stripped from the form, surveyed dimensionally, and stored in the yard awaiting just-in-time shipment to site.
A reputable producer holds PCI Plant Certification, which validates quality control practices through routine third-party audits. Without that independent verification, owners rely entirely on the producer’s self-attestation, which carries far less weight when a load-bearing element fails inspection mid-erection.

Best Practices for Installing Precast Concrete Wall Panels
Field installation is where the schedule wins from off-site manufacturing either compound or evaporate. The lift sequence must be planned in concert with the structural frame, the crane, and the trucking schedule so that every component arrives in the order it will be set.
Pre-Erection Site Readiness
Before the first piece arrives, the foundation system has to be complete and surveyed. Anchor bolt positions, leveling pads, and bearing surfaces all need to fall within the tolerances called out on shop drawings. Crews routinely catch foundation deviations during a pre-erection walk that, if left to the day of lift, would idle the crane and the entire field crew. Builders coordinating integrated commercial building systems should align their critical-path schedules so panel delivery coincides with a fully prepared site.
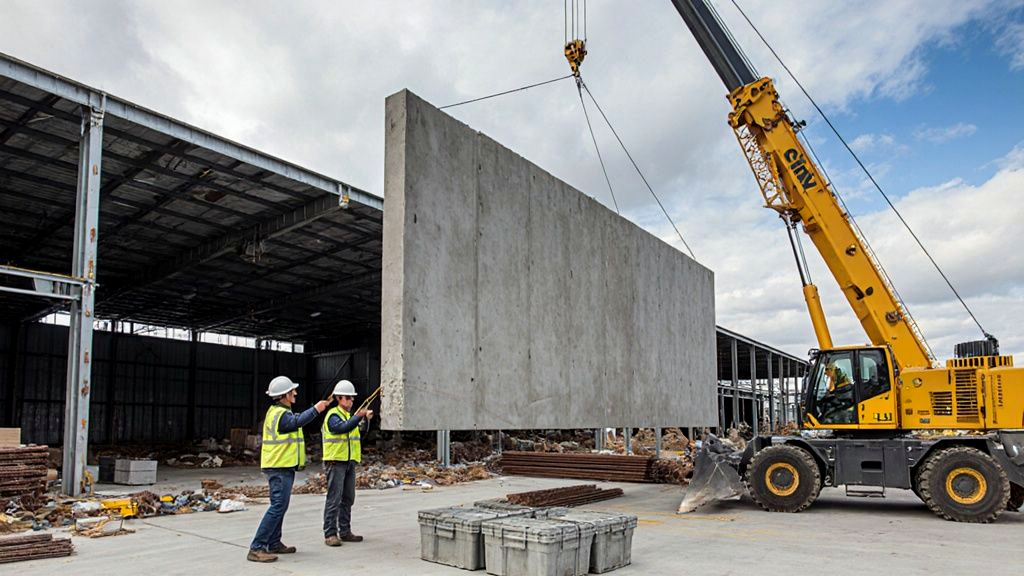
Crane Selection and Lift Sequencing
Heavy units routinely weigh 30,000 to 80,000 pounds. Crane sizing depends on the heaviest piece, the longest reach, and the swing radius required by the building footprint and adjacent obstructions. Erection crews stage components in the sequence they will be lifted, often delivered just-in-time to avoid double-handling on a constrained site. A typical building face can be enclosed at a rate of 8 to 12 panels per shift once the rhythm is established.
Connection, Grouting, and Sealing
Once a panel is plumb, level, and aligned, weld connections to embeds, grout the bearing pad, and torque the connection plates to the values shown on the structural drawings. Joints between adjacent panels are then backed with closed-cell foam rod and sealed with a structural-grade polyurethane or silicone. The seal is what makes the wall watertight; sloppy joinery here invites callbacks years later in the form of efflorescence, interior moisture, or insulation failure.
Common Installation Mistakes That Undermine Performance
Issues that surface after handover almost always trace back to a handful of shortcuts during erection. Catching them on the punch list is far cheaper than chasing them under warranty:
| Mistake | Why It Fails | Fix |
|---|---|---|
| Improperly torqued connection plates | Loose connections allow panel movement under wind load and fatigue the welds | Verify torque with a calibrated wrench and document each connection on the install log |
| Over-grouting the bearing pad | Excess grout reduces the designed bearing surface and creates point loads | Trim flush to the bearing line and confirm pad thickness matches shop drawings |
| Wrong sealant choice in panel joints | Silicone over polyurethane backer rod can fail bond under thermal cycling | Specify a single compatible system: backer rod, primer (where required), and structural sealant |
| Skipping a pre-erection foundation survey | Out-of-tolerance anchors force field modifications that compromise structural integrity | Survey anchor bolts and bearing elevations before the first delivery and reject pieces if needed |
Field tip: Photograph every connection after torquing and before grouting. The visual record protects the contractor during warranty disputes and gives the structural engineer something concrete to review when a question surfaces months later.
Choosing the Right Precast Partner
Precast is a relationship business. The plant a project team selects sets the tempo for design coordination, shop-drawing turnaround, production scheduling, and on-site support. Look for engineering depth that lets the producer engage early in design assist, plant capacity that matches the project size without bumping other commitments, and a track record of on-time deliveries to projects similar in scope. Geographic proximity matters too: trucking large units across long distances adds cost, permitting complexity, and schedule risk that nearby producers avoid.
Ask for references from completed projects of similar scale and visit a recent installation if you can. The way a producer talks about its quality control program, its dispute resolution history, and its post-installation support tells you almost everything you need to know about how the relationship will unfold once the contract is signed.
Planning Your Next Building Envelope?
Heldenfels Enterprises has designed and delivered precast wall systems for commercial, institutional, and infrastructure projects across the region. Let’s talk about your specifications, schedule, and site conditions.
Start the Conversation